Reviews
Luminar Neo for Windows: Full Review and Walkthrough

Picking a good Windows photo editor is essential for smooth post-processing on a PC. The tool has to read your existing structure, feel quick on everyday hardware, and keep changes reversible so you are never locked in. Luminar Neo approaches that reality with a straightforward layout and a workflow that favors clarity.
In this Windows-focused review, we will map out a practical path to tell you whether Luminar Neo fits your PC setup and how you like to deliver.
Getting Started on Windows: Install & First Look
Luminar Neo installs just like any modern photo editor for Windows. The only setup choice that matters is where to place your Catalog (many users pick an SSD for speed). After that, you can add folders directly — the software references your files without duplicating them.
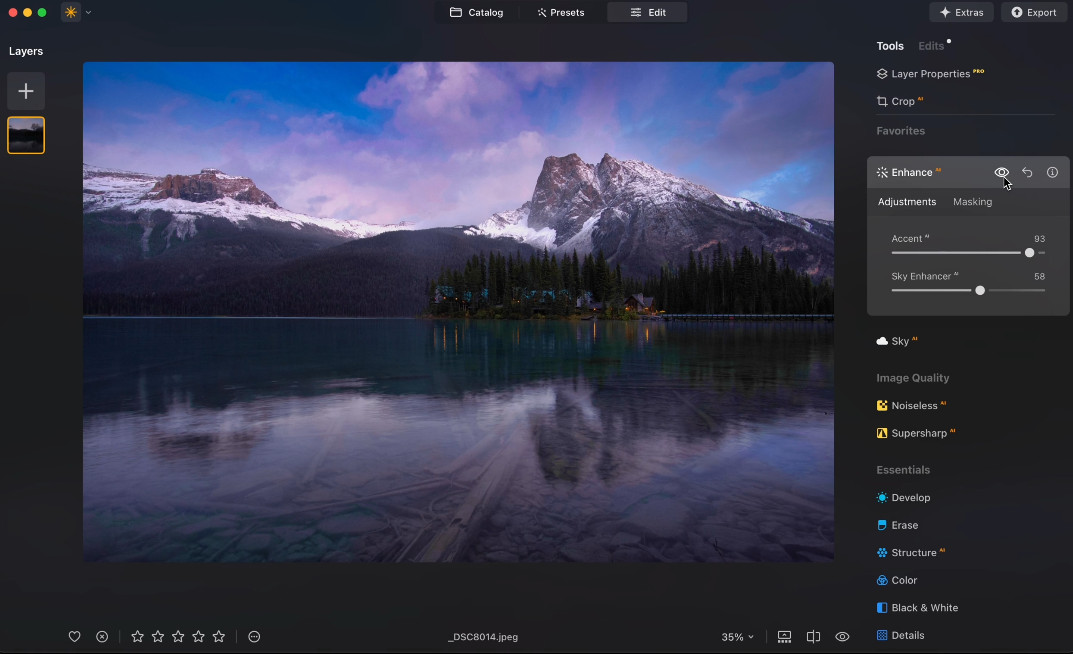
- Left panel: Folders and Albums for quick navigation.
- Center canvas: Smooth zoom options (Fit, Fill, 100%) with responsive previews.
- Right panel: Tools stacked by task, each with sliders and numeric fields.
- Edits list: Records every change non-destructively, so you can toggle, reorder, or roll back at any time.
For side-by-side certainty, Luminar Neo includes instant Before/After views and split comparisons — handy when working on a calibrated display.
Use Neo for the heavier lifting: RAW files, masks, layers, and AI adjustments that remain reversible. For quick browsing or casual checks, lighter viewers like the built-in Windows Photo Viewer are still faster, but when precision and consistency matter, keeping the edits inside Neo ensures results that stay true to your originals.
Features Windows Users Will Lean On
On Windows, the most useful helpers are the ones that save minutes without changing your style. Luminar Neo is an easy AI photo editor that automates tedious post-processing tasks without compromising users’ creativity.
Here are some tools you might want to try:
- Sky AI adds presence to flat skies without haloing foregrounds. It targets the sky region intelligently, letting architecture and trees hold their edges; a small boost often saves a frame from looking dull.
- Color Transfer matches the palette of a reference shot to your current image to keep a multi-camera project coherent. Use the image color transfer to borrow mood (warm evening, cool studio, muted product line) and then fine-tune with masks so skin, logos, or neutrals stay accurate.
- Relight AI fixes difficult lighting without heavy masking. Adjust “Near” and “Far” brightness separately to balance backlit rooms or windowed interiors; add a touch of warmth to unify mixed sources while keeping highlights clean.
- Face AI provides fast, natural tweaks for team headshots and event portraits. Lift face light, even under-eye shadows, and refine eyes/teeth with conservative sliders. Every move is reversible. You can keep retouching subtly and consistently across a set.
- Portrait Bokeh AI creates believable background separation when you don’t have a fast lens. You can control blur strength and edge transition, then refine hair or accessories with a brush so the subject does not look cut out.
- GenErase (Generative Erase) removes poles, signs, or stray tourists with context-aware fills. It is ideal for quick cleanups on travel and street shots; review at 100% and, if needed, blend the result with a light brush pass for seamless texture.
Performance on Windows: What Really Speeds Things Up
Smooth performance in Luminar Neo largely depends on how you set up your system. First, keep the Catalog on an SSD or, ideally, an NVMe drive, and store your active projects on local fast storage. Network folders or slower HDDs tend to add noticeable delays to every step. Also, make sure hardware acceleration is enabled and your GPU drivers are updated via NVIDIA, AMD, or Intel’s official tools.
If you are only learning how to edit photos on Windows, generating previews once for an entire shoot will make scrolling and 100% checks feel instant. For heavier edits, keep adjustments modular: tone on one layer, color on another. That way, if performance drops, it’s easy to pinpoint and disable the step that slows things down. Avoid applying heavy clarity or multiple texture tools globally — use masks to keep the edits targeted and efficient.
Exports can also be optimized. Queue them up and let the process run in the background while you cull another folder. Clear naming for export presets (e.g., “Proofs_2048_sRGB” or “Print_TIFF_16bit”) helps keep results consistent across different PCs and team members. And don’t forget: keeping Windows, GPU drivers, and Luminar Neo itself up to date often brings bigger speed gains than any editing shortcut.
Pros and Cons from the Windows Perspective
| Pros | Cons |
| Clean Windows UI with fast navigation, non-destructive history, and solid compare tools | Older GPUs or RAM-limited PCs may slow down with heavy AI stacks |
| AI set (Relight, Face, Portrait Bokeh, Sky Enhancer, GenErase, etc.) is quick to apply and easy to dial back | Generative/AI passes still need a 100% edge check to avoid visible artifacts |
| Color Transfer enables cross-camera consistency for team workflows | Color-matching and light-matching for composites still require human oversight |
| Reliable exports with reusable presets, correct color spaces, and consistent results | Large RAW files or multi-layer edits demand strong hardware for best responsiveness |
| Works smoothly on modern Windows setups with NVMe/SSD storage and updated GPU drivers | Some advanced features (batch, layers, detailed masking) have a learning curve for beginners |
Conclusion
Luminar Neo is renowned as a powerful and user-friendly photo editing tool for Windows. It offers a range of AI-driven functions that enhance creativity while ensuring non-destructive editing. Its efficient performance, especially on modern hardware, makes it an excellent choice for users of all skill levels who want to streamline and simplify their image-enhancing workflow.

-

 Legal6 days ago
Michigan man JD Vance sentenced to 2 years for threatening Trump and JD Vance
-

 Politics1 week ago
U.S. to designate Maduro-linked Cartel de los Soles as terrorist organization
-

 Health7 days ago
Cambodia reports fatal H5N1 bird flu case in 22-year-old man
-

 World4 days ago
Hurricane Melissa registered 252 mph wind gust, breaking global record
-

 Legal4 days ago
Woman in critical condition after being set on fire on Chicago train
-

 Politics7 days ago
Epstein survivors release PSA calling on Congress to release all files
-

 Legal4 days ago
1 dead, 2 injured in shooting at Dallas Walmart parking lot
-

 Legal3 days ago
Suspect in San Diego stabbing shot by authorities after fleeing into Mexico


